RPGMaker Trans v3 Patch Format
Patch Structure
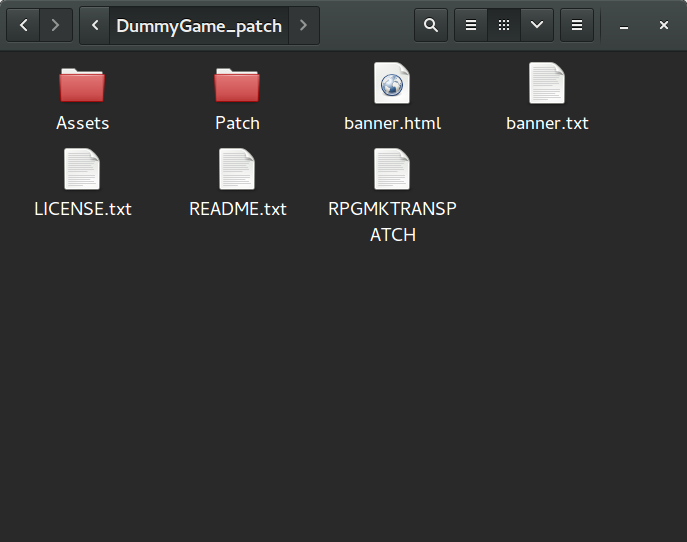
Opening a patch folder with give you at least three things.
RPGMAKERTRANSPATCH file This file identifies that the folder is an RPGMaker Trans Patch, and it's version. Leave it alone!
Assets folder The Assets folder is primarily for any graphics which need to be translated. During patching, the Assets folder will be copied over the target folder. So if you need to translate Pictures/Something.png, create a Pictures folder inside the Assets folder and place Something.png inside it. Easy!
Patch folder The Patch folder contains all the patch files RPGMaker Trans uses. While RPGMaker Trans will organise the data in a certain way, you're free to modify where things are in the patch files, or even create new ones (which may be necessary if the patch files are particularly large). For the next section, open up a patch file!
One thing to note is that you are free to put whatever you want into the root of the patch. If you want to put additional materials into the patch (the example includes a README.txt and LICENSE.txt) this is a good place to put them. I would strongly encourage all translators to include a LICENSE.txt to establish the terms under which your patch may be used. Creative Commons is a good place to start if you wish to freely distribute your patch. I would recommend CC BY-NC-ND
The banner.html and banner.txt files are special. They provide an easy way for a translation author to display information to the user. Information on these can be found in the Banner Files section.
If you want to give some material more prominence (like a translated by credits file), place it in the root of the Assets directory so it appears in the translated games folder.
Translating
Actors.txt
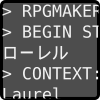
A typical Actors.txt file will look like this example. The first line is an identifier. Any file must declare itself to be an RPGMaker Trans Patch file like this, or it will be ignored. If you create any extra patch files, make sure that they include this header.
After this, a string is declared by > BEGIN STRING. The original string is given HeroName on the next line. Lines beginning > CONTEXT: define where the string in question occurs with the game; each string can have multiple contexts. After the empty translation line, the block is terminated by > END STRING.
To translate HeroName, just place your translation on the empty line provided. You don't have to worry about the < UNTRANSLATED mark, as rerunning RPGMaker Trans will take care of it for you.
When translating dialgoues, you don't have to worry about line limits. RPGMaker Trans is smart enough to spread the dialgoue across multiple windows, if necessary. You do have to worry about character limits however, and as recent RPGMaker Games allow you to set a font, RPGMaker Trans cannot tell you what your line limits are. Just try to be reasonable, and hope for the best.
Repeated Strings
CommonEvents.txt
Map040.txt
Some strings are going to appear more than once in a game. Most games will feature a lot of Yes/No dialogs, for example. RPGMaker Trans will group all instances of the same string together. The example shows a CommonEvents.txt which also includes strings from Map040.txt. By placing the translation after all the contexts, all of them are translated identically.
You can also translate strings differently by supplying multiple translations. In this example, the first context is translated as Yeah, while the remainder translate as Yes. Feel free to move contexts around so you can minimise the number of translations you need to provide.
Comments and Escape Characters
CommonEvents.txt
Comments can be used with the # symbol. Everything on a line after a # is a comment and won't appear in the translation. Also note that any trailing whitespace is stripped from a translation, so the trailing space before the comment can be left there.
As RPGMaker Trans uses some symbols for special purposes, if you want these in your translation they must be escaped. So if you want to use any of >, # or \ in your translation, they should be escaped by adding a \ character in front (so they become \>, \# or \\).
Scripts - Here Be Dragons
Scripts.txt
One important file that will almost certainly require translation is Scripts.txt - and indeed, wherever a Scripts context occurs. These context modify the Ruby scripts that control RPGMaker, and as such modifying them has the potential to break the game in various ways. The most notable difference is that each translation should be enclosed by the same kind of marks as it's untranslated form (e.g. "). RPGMaker Trans will do some basic checks and refuse to insert Ruby which it thinks is suspect, but this is not foolproof. For more information, it's recommended to read a tutorial on Ruby.
RPGMaker Trans will translate strings and regular expressions. Normally regular expressions can be left alone, but in some cases modifying a string in the UI will require modifying a regular expression as well.
Banner Files
<center>
  <a href="/patchformatv3.html">
    <b>Documentation Game Patch<b>
  </a>
  <br/>
  <b>Translation Copyright 2015 Habisain</b>
  <br/>
  <b>Original Game</b><br/><b>Copyright 2015 Some Other Guy</b>
  <br/>
  <a href="https://creativecommons.org/licenses/by-nc-nd/4.0/">
    Translation Licensed under<br/>CC BY-NC-ND 4.0<br/>
    <img width="88" height="31" title="" alt="" src="data:image/png;base64,iVBORw0KGgoAAAANSUhEUgAAAFgAAAAfCAYAAABjyArgAAAGa0lEQVRo3u1aW08bRxTmuSqIV0SlIFWtAKkVtEpfWiVI6Q+gT60qpeIhTXkrSpqoaZ1AkJMobSRkkUahEtAWCVWBYMDcfME22MZ3rw0hrzzwAxC/4FTfrGeYXXa9u8Y0yGGkEeu5nGW+OfOdy2wDETU1NDTQea19JcKf8o/lwBKthlbIH16j0EaQwrEwbSSiFEvFaCuToFQuSel8mrKFDOWULOWKObUqWcoqGcrk02wMxsZTMTY3EgszWf6wn8nGO3xri7SwOk/zy16aW3pJL32zrM4uztDMwou6qRLQR+AGIn5a3wxRNB6hWHKTgZXOpxiAhVKeijsKlV4VaXt3m3ZeqxXPpVcl1ocxWSXL5mAuZEQTESYTsvUge5fnBMgAuE5BbtCCm4gyDUxmk0xbARpAdT9w05Uvr1BjU+Oxo4A29LkfutnYwnaBbQo0Op6OM21e31zXgLy4tkDzK14VZN8RyHdcd6ijo+PYO9CGPruLOwtyBMCgBRlcAJMrZplWekY91Nraapt3MNbz1MPmgkKgzQkBckjQxZLfR4urKsjQ4j/GnlJ7R7uQ09PTQwMDA6zimbdjzOjzUdNFoe+syBEAgydBC0fg5pgm9n7VqwGvubmZ+vr6aGhoiCKRCKt4Rhv65LGYG0/GKF9SQYYmgy5UTl6jleCyoIp/pv+mpqYmdV5vL+3t7ZG+oA19GIOxRouanJo4U3IEwDBo4EvQAjRXDy7AA5AHBwdUqUxOTmqAxu4CZGwYNg7vgOELRgO0tr6qUsXqgjiC2Ci5SNZY8w4uW78grnF6OZ6REfr2629OLMdszWZyBMA4vjBK4FwcbRncrq4uwx00K9gEzJE1GTLByXjHEVWoWnx30CU05fXuriXAKFxzZA7EM9o+6e6mP5+PacBtaWmhxncb6fbNn2h/f9+WHKP/x6wYydEAHGPUkGIGDZwrg2ultXZABifD8DGqSMUoEle1GFzc0alqr5NNxFhuaPhi+Clo/+BDev9CG13+/Avq//46a8Ppe/TwEXuenZmxJeek/48GYKa9SoZRAzdoOOqKolC1BSBzuoBMyIYLx7U4tKFqMTcg+oLjyTfI6KhyQyMvBm23btykn2/dZiDzyjXXSCPN5MhFliXXSnI0AIMf86U8c8X4orDrJy2cn1DhwuGEcC4Ol9029MEy64tBVKQpmKMHRpaTSiYZsLIM/NaDbCUHpf+HfsNaSY4GYERoyo7CfFmuvTI1wFsAz2CXUGXw9X0jIyOaF3MthmxwMSI+mSZOC2BeoLkAtvujj4XmweAF/H5HcqxKRYBh3HCEeRAhH0kAaOTvAkyv12vYJ8/nRx2yEfGBihJlly0YDdacIuRyeHhIE+Pj7Bmaqz/i4On/hSKQT9jeLYkFyVrIjVVbWxsjcwCOZxx/3sc9DQDO+4xoAmF1TsPDQers7DQ1Kmbaa9c4QVMBBLQXldMEDN29X110ofU9W3KuX7tmWG0bOfi+yCvwBQFE/SKNONkOX8snAO+AT7yV2RIAD96/J9wiuwBbuVcyPbjvDws3DS4btNqpnBO7aW8SYAQc3FWzE2hwrnMSIDz57fdjgUY1cipxb8VAwy5FwPDBdcMzQJUpQt9nlyIA8PSL6foOlSsZuUqGzI6R4zusGrkie5ds5ADwUsBHU/9OabJW2DTIwXw5aLFK0gAcOUnzJuUcc9N4iAzXSn/Mzdw0gMzb9X0o0GjZTUtLblogEhCZNZYfXpqjX+7WYbqSBxpymKz3Z2sZaGyWAw2kLnlWjact6+l2QwCcSBuHyk7i8WpDZTn5XrcAy8meib/Ga5/sGfUw2Uj24F08ZSkn3vnNRj1dHQmAUV2DLpGuvPrdVQ3ITpI+0HrDdGUhQ8MPht/G2+WjHwM3fmRuVLGKhDv6MEZOuF/87CKjBvjZrnLe960GGBUJcAQDAFnW5GqujABuvpijZ2PP7H5HYBhk6MfYkWP22yyZ5EROpaSUJcACZEW99AQnO770HOWXnlnb4BoBYbQwJxtVab7djaqBHOMO0IV8bQ/QrK7tcXPBru3xfUQh45gWrNKVTjfK7G8t5VQNMLvf+rSbvIte5sLBT1bEhycl6cOTEmuTPzyZ93np0uVL1XxqdCJqsKKEajS4BnKs/2GA9fjJYwpFQ9KnU+WKT6cKGdaHMdUAe1oafGY5+LzWsBLRO+dAnN7Xlf8BOGLNYHeHmZwAAAAASUVORK5CYII=" />
  </a>
</center>
Translation Copyright 2015 Habisain
Original Game
Copyright 2015 Some Other Guy
Translation Licensed under
CC BY-NC-ND 4.0
The files banner.html and banner.txt provide a simple and moderately effective way to display information to the user when they apply the patch. The GUI version of RPGMaker Trans will try to display banner.html before falling back on banner.txt, while the CLI build will only display banner.txt.
If you decide to make a patch banner, consider putting the following info in it:
- The name of the target game, where it can be found, and the original author
- Names of translators
- A link to where the newest version of the patch can be found
- The license of the translation patch
The figure gives an example banner.html. banner.html can only display a restricted subset of HTML, which is given in the QT specification. In addition banner.html cannot reference files in the patch; if you wish to include graphics, it is recommended to use data URIs, which guarantee the graphics will display. RPGMaker Trans will guarantee an area of 300x400px to display your banner, and it is strongly recommended that after writing the patch banner you test it.
Understandably, banner.txt has less restrictions. In general, you should make sure that lines in banner.txt are less than 79 characters long, otherwise they may not display well. It becomes more complex if you wish to use banner.txt in the GUI, but the rule remains the same: test before deploying.
Distribution
Once you've got your patch ready to go, the preferred form of distribution is to just ZIP the entire thing up and post it to the web. ZIP is preferred as RPGMaker Trans can natively read ZIP files, which makes it much more convenient than other archives which would require the user to decompress them.
It's strongly advised not to upload prepatched games or data files. Doing so will violate copyright on the original game, which is in general, a bad thing. The other major advantage is that due to the way that RPGMaker Trans works, if a new version of the game is released, you do not have to reupload your patch.